Jenkins 自动化集成
 此功能需要自动化工具箱许可证。
若用户持有有效的Otii自动化工具箱许可证(Otii Automation Toolbox),可在Otii中启用TCP服务器,从而实现从其他应用程序控制Otii。借助此功能,用户可将 Otii 部署在持续集成(CI)环境中,自动追踪固件(Firmware)版本迭代对设备功耗带来的影响。
以下示例演示如何添加一个结合了 Jenkins 与 Otii 的测试作业(Test job),以确保固件的代码变更(Code changes)不会对系统功耗产生负面影响(如导致功耗倒退/劣化)。
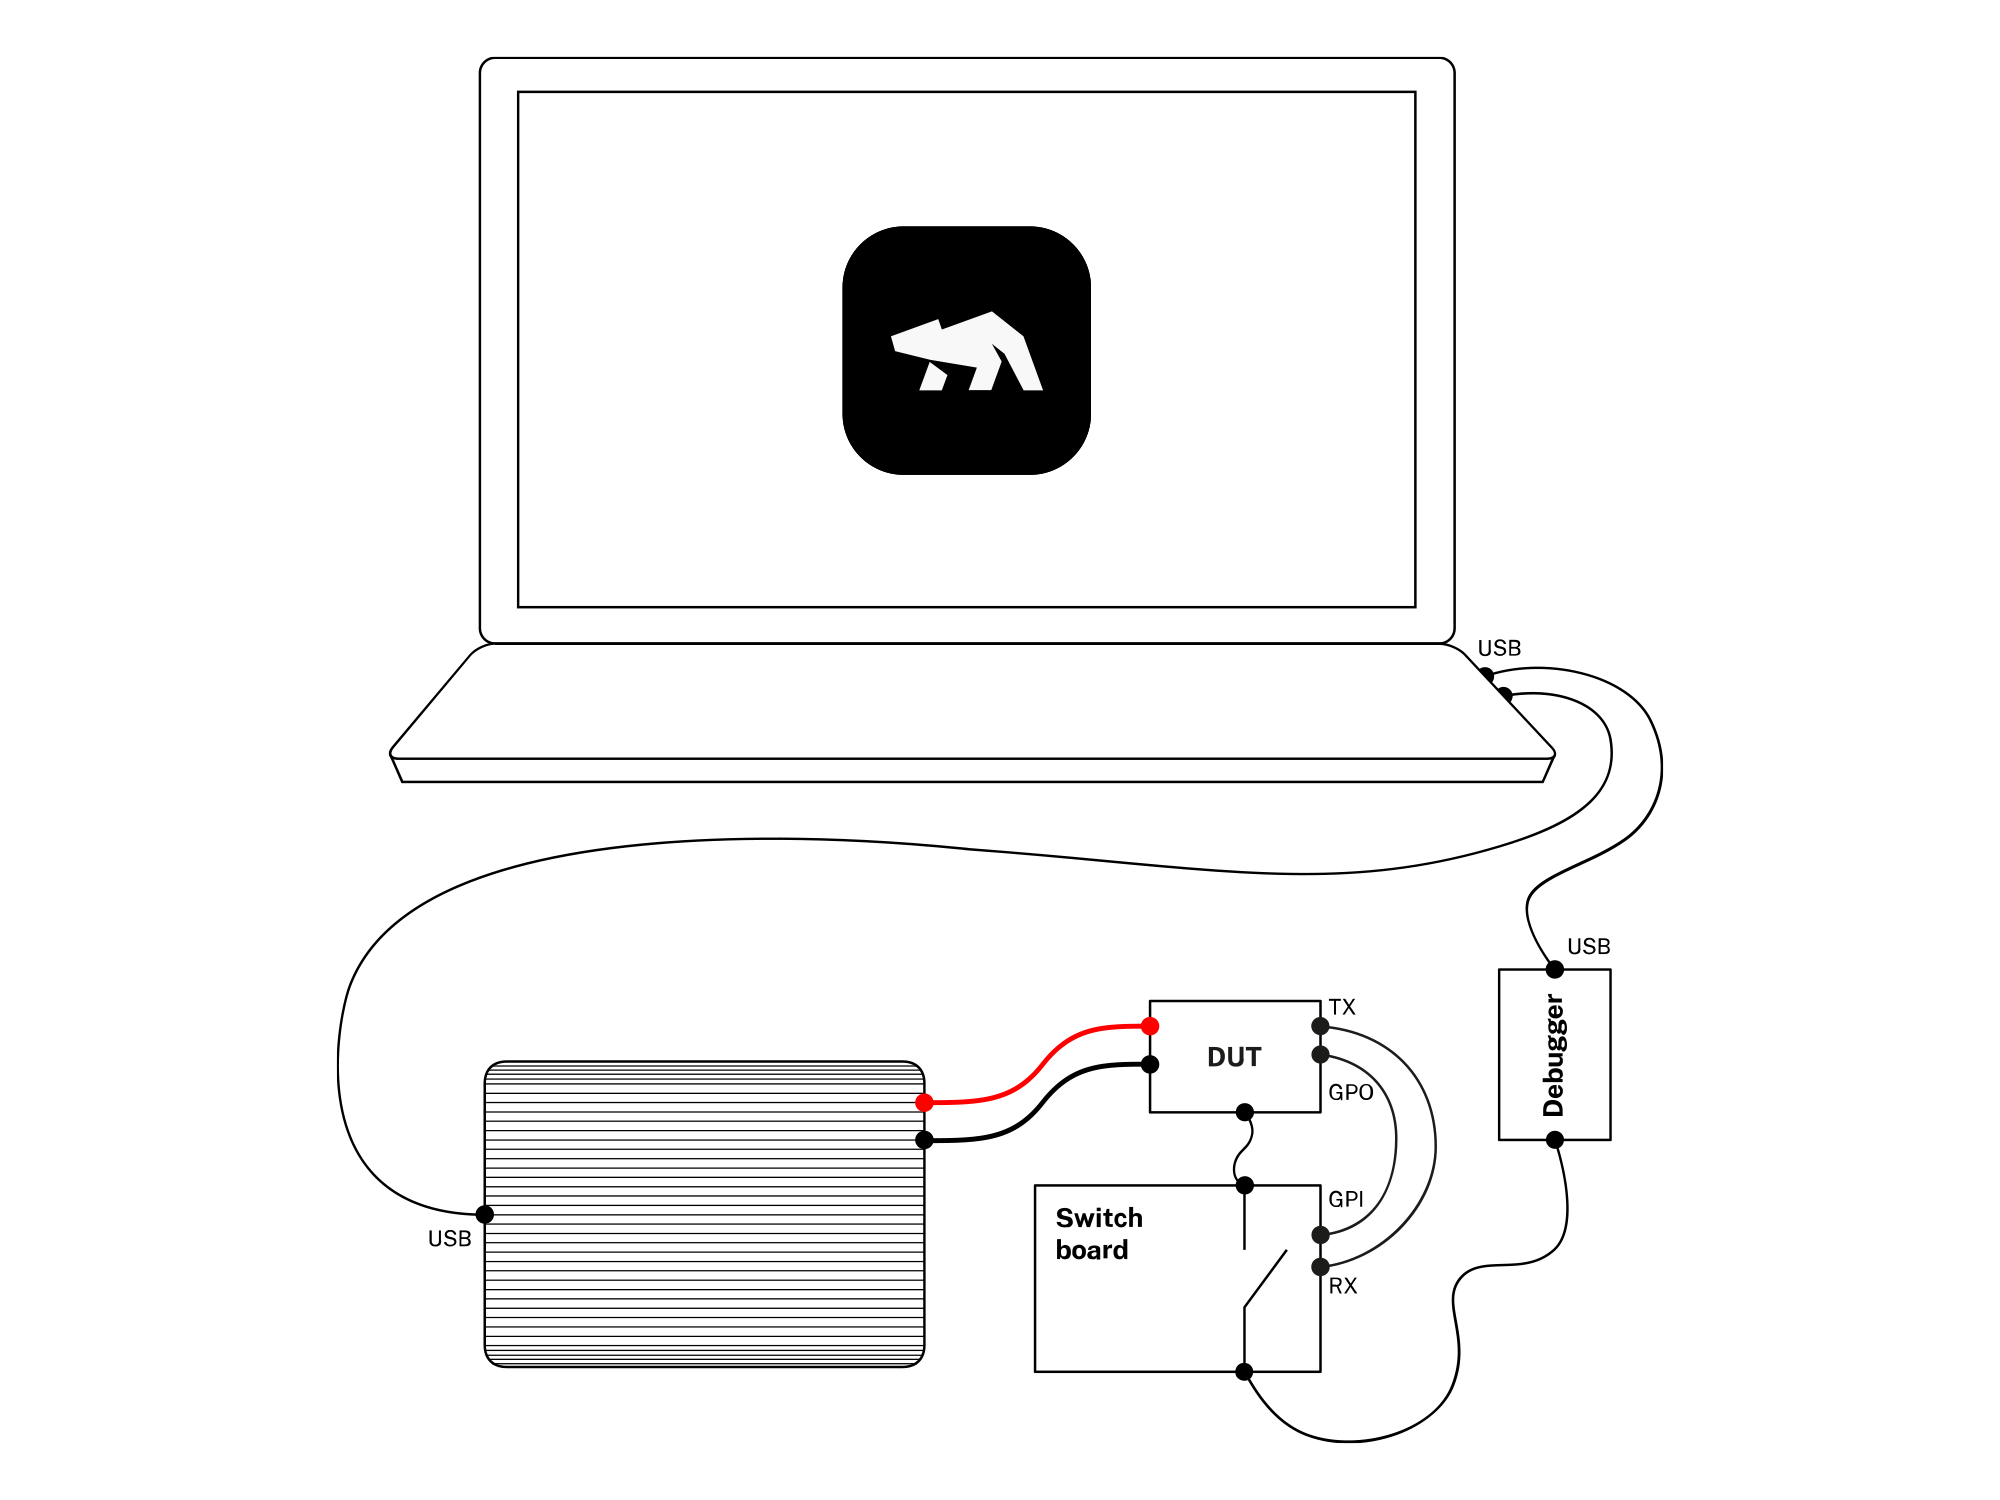
测试系统架构
本示例采用 ST32 Cortex M4 开发板,通过 ST-Link 调试器编程。开发板由 Otii 供电,并通过 SWD 接口连接至 ST-Link,以便刷写新固件。为了获取最真实、精确的设备功耗测量数据,在实际进行功耗测试期间,必须断开 ST-Link 与开发板的连接。为此我们开发了一块简易开关板,通过Arc扩展接口连接并由Arc的GPO控制。该设计可在烧录固件时自动连接SWD,而在进行能耗测量时自动断开连接。
该设备连接至Otii Arc的RX和GPI1接口。本例中,这两个接口用于标记需要验证的测量环节的起止点。
Python Otii 客户端
用户需要先安装Otii Python客户端,更多详情请参阅“ 使用Python编写脚本"章节。
初始启动
创建名为otiitest.py的测试Python脚本。我们将使用内置的Python单元测试框架unittest运行测试。在otiitest.py中添加以下代码:
#!/usr/bin/env python3
import unittest

class OtiiTest(unittest.TestCase):
    def test_energy_consumption(self):
        pass

if __name__ == '__main__':
    import xmlrunner
    unittest.main(testRunner=xmlrunner.XMLTestRunner(output='test-reports'))
运行测试脚本
确保脚本可执行:
chmod a+x otii_test.py`执行脚本:
./otii_test.py

Running tests...
----------------------------------------------------------------------
.
----------------------------------------------------------------------
Ran 1 test in 0.000s

OK
配置 Otii TCP 服务器
关于如何配置并启动TCP服务器,请参阅TCP 服务器 文档,可通过Otii桌面客户端或者Otii命令行工具进行操作。
如需从测试脚本自动启动服务器,请参阅“ 使用Python编写脚本(Scripting with Python)”章节。
连接至Otii TCP服务器
下一步即从测试脚本连接至Otii TCP服务器:
#!/usr/bin/env python3
import sys
import unittest
from otii_tcp_client import otii_connection, otii as otii_application

HOSTNAME = '127.0.0.1'
PORT = 1905

class OtiiTest(unittest.TestCase):
    def test_energy_consumption(self):
        connection = otii_connection.OtiiConnection(HOSTNAME, PORT)
        connect_response = connection.connect_to_server()
        if connect_response["type"] == "error":
            print("Exit! Error code: " + connect_response["errorcode"] + ", Description: " + connect_response["payload"]["message"])
            sys.exit()
        otii = otii_application.Otii(connection)

if __name__ == '__main__':
    import xmlrunner
    unittest.main(testRunner=xmlrunner.XMLTestRunner(output='test-reports'))
配置Otii Arc设备
现在我们查询 Otii 中所有可用设备,并尝试找到正确的Otii Arc 设备。
用户可通过为每一台Otii设备分配唯一名称,可确保使用正确的设备。
...
PORT = 1905
ARC_NAME = "TestArc1"
...
class OtiiTest(unittest.TestCase):
    def test_energy_consumption(self):
        ...
        devices = otii.get_devices()
        if len(devices) == 0:
            print("No Arc connected!")
            sys.exit()
        devices = [device for device in devices if device.name == ARC_NAME]
        if len(devices) != 1:
            print("Expected to find exactly 1 device named {0}, found {1} devices".format(ARC_NAME, len(devices)))
            sys.exit()
        arc = devices[0]

        arc.set_main_voltage(3.3)
        arc.set_exp_voltage(3.3)
        arc.set_max_current(0.5)
        arc.set_uart_baudrate(115200)
        arc.enable_uart(True)
        arc.enable_exp_port(True)
        arc.enable_5v(True)  # The switch board is powerd by the Otii +5V pin.
将主输出端口和扩展端口配置为3.3V,将最大电流设置为500mA,并将UART波特率配置为115000,随后启用UART和扩展端口。
测量
现在已准备好,开始测量。
...
import time
...
MEASUREMENT_DURATION = 5.0
...
class OtiiTest(unittest.TestCase):
    def test_energy_consumption(self):
        ...
        project = otii.get_active_project()

        arc.enable_channel("mc", True)
        arc.enable_channel("i1", True)
        arc.enable_channel("rx", True)
        arc.set_main(True)

        project.start_recording();
        time.sleep(MEASUREMENT_DURATION)
        project.stop_recording();

        arc.set_main(False)
分析测量数据
演示系统通过UART发送启动和停止指示信号,用于执行温度测量功能,并利用数字输入标记每次温度测量的间隔。
使用RX分析数据
该系统中,被测设备(DUT)在启动温度测量时发送日志消息“获取温度(Getting temperature)”。用户可通过两条此消息来提取完整周期的能耗数据。
...
class OtiiTest(unittest.TestCase):
        ...
        recording = project.get_last_recording()
        index = 0
        count = recording.get_channel_data_count(arc.id, "rx")
        data = recording.get_channel_data(arc.id, "rx", index, count)
        values = data["values"]
        timestamps = [value["timestamp"] for value in values if value["value"] == "Getting temperature"]
        self.assertGreaterEqual(len(timestamps), 2, "Need at least two \"Getting temperature\" timestamps")

        statistics = recording.get_channel_statistics(arc.id, 'mc', timestamps[0], timestamps[1])
        self.assertLess(statistics["energy"], 0.0004, "One interval consumes to much energy")
        self.assertGreater(statistics["energy"], 0.0002, "One interval consumes to little energy, is everything up and running?")
使用GPI1分析数据
在此系统中,被测设备(DUT)在唤醒时发送一个微小脉冲以启动温度测量。我们试图捕捉前两个脉冲,并提取该时间段内的能耗数据。
...
class OtiiTest(unittest.TestCase):
        ...
        index = 0
        count = recording.get_channel_data_count(arc.id, "i1")
        gpi1_data = recording.get_channel_data(arc.id, "i1", index, count)["values"]
        timestamps = [gpi1_value["timestamp"] for gpi1_value in gpi1_data]
        self.assertGreaterEqual(len(timestamps), 4, "Need at least four GPI1 pulses")

        statistics = recording.get_channel_statistics(arc.id, 'mc', timestamps[0], timestamps[2])
        self.assertLess(statistics["energy"], 0.0004, "One interval consumes to much energy")
        self.assertGreater(statistics["energy"], 0.0002, "One interval consumes to little energy, is everything up and running?")
构建并上传固件
当新固件合并(merge)到代码库的master分支时,Jenkins将被触发两个任务:构建固件,然后将新固件上传至设备。
由于这一过程仅需执行一次,因此我们向OtiiTest类添加了类方法setUpClass。它会在单元测试运行前调用一次。
由于测试系统中有一块Otii Arc控制的开关板来启用调试器,因此需要将原本放在测试函数中的连接和设置部分移至setUpClass方法中。我们将otii和arc设为类属性,该类中的所有测试都可以访问和使用它们。
...
class OtiiTest(unittest.TestCase):
    otii = None
    arc = None

    @classmethod
    def setUpClass(cls):
        # Connecting to Otii and setup Arc
        connection = otii_connection.OtiiConnection(HOSTNAME, PORT)
        ...
        arc.enable_5v(True)  # The switch board is powered by the Otii +5V pin.

        # Turn on the main power, and give the DUT time to startup.
        arc.set_main(True)
        time.sleep(1.0)

        # Enable the USB, and give the ST-lINK time to startup
        arc.set_gpo(1, True)
        time.sleep(3.0)

        # Upload new firmware
        result = subprocess.call("cd ../firmware; make; make upload", shell=True)
        if result != 0:
            print("Failed to upload new firmware")
            sys.exit()
        time.sleep(3.0)

        # Disable the USB, and turn off the main power
        arc.set_gpo(1, False)
        time.sleep(1.0)
        arc.set_main(False);

        def test_energy_consumption
        ...